NoMachine (free version) - Installation and Configuration Guide (v.6)
|
|||||||||||||||||||||||||||||||||||||||||||||||||||||||||||||||||||
| 2.3. Mac Installations |
|
INSTALL Step 1: Welcome to the installer! Click on Continue to start the installation. Step 2: Read the License Agreement and Agree. Then click on Continue to proceed. Step 3: Provide administrative credentials and confirm by clicking on Install Software. Then click on Install and wait until Installer completes. Step 4: The installation phase is now complete, click on Close to exit Installer.
|
|
|
UPDATE |
| I | Automatic updates
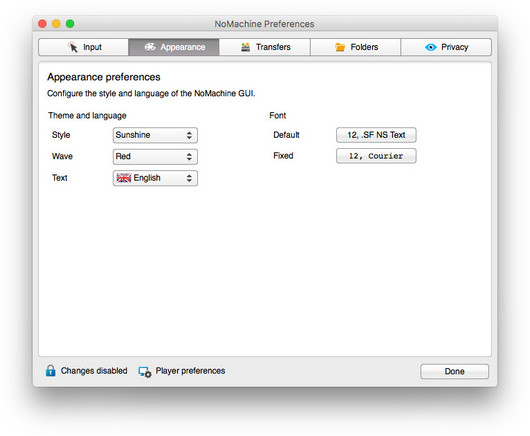
You can update your installation from our repositories. Just open the NoMachine User Interface from Applications, access the 'Settings' panel and click on 'Server preferences'. Go to the 'Updates' panel and click on the 'Check now' button. NoMachine has the automatic check for updates enabled: it will periodically check our repositories (by default every two days) to verify if updates are available. In this case, NoMachine will prompt a dialog informing that a new version is available but it will never automatically update the current installation. Checking for updates can be disabled from that dialog by selecting the 'Don't ask again for this version' option or in the Updates panel by unchecking the 'Automatically check for updates' option. Detailed instructions for configuring the Automatic Updates are available in this separate document: https://www.nomachine.com/DT10O00149. |
| II | Update with NoMachine packages
Alternatively, you may download the latest available package from the NoMachine web site and click on the executable file to launch Setup. As for the installation, Setup will guide you through all steps necessary for updating your installation. |
|
UNINSTALL |
| 2.4. Linux Installations |
Installing for the first time
You can install, update and uninstall using the graphical package manager of your Linux distribution or from command line by running commands from an xterm or similar with the sudo utility, or as root user if you don't have sudo installed. Instructions below refer to installation by command line .
Successive updates
The update procedure for server and node installations requires to stop all NoMachine services in order to correctly replace libraries and binaries. This implies that all running sessions are terminated during the update procedure and cannot be recovered later. This applies to upates made by using NoMachine packages and to automatic updates from NoMachine repositories.
There are two ways to update your current installation:
| I | Automatic updates
You can update your installation from our repositories. Just open the NoMachine User Interface from your Programs Menu, access the 'Settings' panel and click on 'Server preferences'. Go to the 'Updates' panel and click on the 'Check now' button. NoMachine has the automatic check for updates enabled: it will periodically check our repositories (by default every two days) to verify if updates are available. In this case, NoMachine will prompt a dialog informing that a new version is available but it will never automatically update the current installation. Checking for updates can be disabled from that dialog by selecting the 'Don't ask again for this version' option or in the Updates panel by unchecking the 'Automatically check for updates' option. Detailed instructions for configuring the Automatic Updates are available in this separate document: https://www.nomachine.com/DT10O00149. |
| II | Update with NoMachine packages
Alternatively, you may download the latest available package and use the graphical package manager of your system to install it or do it from command line as explained below. |
| 2.5. RPM Packages |
If you want to install to default location /usr/NX, run from a console any of the following commands as root:
INSTALL
| rpm -ivh <pkgName>_<pkgVersion>_<arch>.rpm |
UPDATE
| rpm -Uvh <pkgName>_<pkgVersion>_<arch>.rpm |
UNINSTALL
| rpm -e nomachine |
If you want to install to a non-default location, for example /opt/NX
INSTALL
| rpm -ivh <pkgName>_<pkgVersion>_<arch>.rpm --prefix /opt |
UPDATE
| rpm -Uvh <pkgName>_<pkgVersion>_<arch>.rpm --prefix /opt |
UNINSTALL
| rpm -e nomachine |
| 2.6. DEB Packages |
If you want to install to default location /usr/NX, run from a console any of the following commands as sudo user:
INSTALL
| sudo dpkg -i <pkgName>_<pkgVersion>_<arch>.deb |
UPDATE
| sudo dpkg -i <pkgName>_<pkgVersion>_<arch>.deb |
UNINSTALL
| sudo dpkg -r nomachine |
|
If you want to install to a non-default location, for example /opt/NX INSTALL
UPDATE
|
| 2.7. TAR.GZ Packages | |
|
If you want to install to the default location /usr/NX ensure that package is placed there. |
|
|
INSTALL |
|
| cd /usr sudo tar xvzf <pkgName>_<pkgVersion>_<arch>.tar.gz sudo /usr/NX/nxserver --install |
|
UPDATE |
|
| cd /usr sudo tar xvzf <pkgName>_<pkgVersion>_<arch>.tar.gz sudo /usr/NX/nxserver --update |
|
UNINSTALL |
|
| sudo /usr/NX/scripts/setup/nxserver --uninstall |
| then, remove the installation dir: |
| sudo rm -rf /usr/NX |
| If you want to install to a non-default location, for example /opt/NX, extract the archive in /usr/NX and then use the following commands: |
|
INSTALL |
|
| sudo NX_INSTALL_PREFIX=/opt /usr/NX/nxserver --install |
|
UPDATE |
|
| sudo NX_INSTALL_PREFIX=/opt dpkg -i /usr/NX/nxserver --update |
|
UNINSTALL |
|
| sudo /opt/NX/scripts/setup/nxserver --uninstall |
| then, remove the installation dir: |
| sudo rm -rf /opt/NX |
| 2.8. The NoMachine Monitor in Your System Tray | ||||||||||||||||||||||||||||||||||||||||||||||||||||||||||
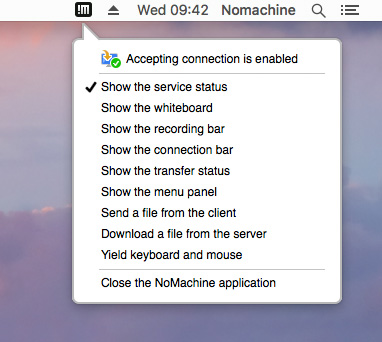
| Once you have terminated the installation or the update, including reboot when requested, a NoMachine icon (!M) will appear in your system tray. This is the NoMachine Monitor, a small application which gives you fast access to server management tools and User Interface and advises you when someone is requesting to connect.
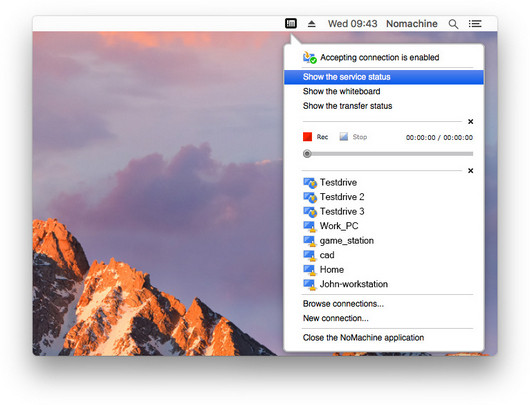
Click on the !M icon to open the menu and have quick access to its functionality:
Fig. 1 - Use the Monitor (!M) to access server functionality via 'Show the service status'
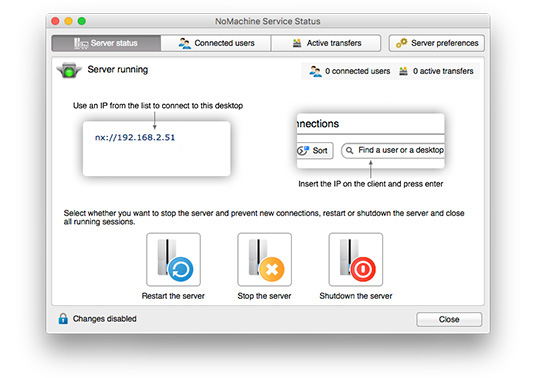
If you want to connect to a computer, you will need to know its IP address. To know the IP address of a specific NoMachine host, open the NoMachine User Interface on that computer, and you will see a 'Welcome' panel like this one:
Fig. 2 - Open the NoMachine application on the host to know its IP address If you want to connect to this computer over the Internet, write down the external IP address and its port number. In our example: nx://151.1.192.128:29382. If you are connecting on a local network instead, you just need the private IP, 192.168.2.29 in this case. You will need this information when creating the connection to this host from your client device. Follow these quick steps: Step 1: Go now to the client device from which you want to connect to this host. Install NoMachine, which can make connections as well as accept incoming connections) or NoMachine Enterprise Client. Step 2: Run the NoMachine User Interface from the programs or applications menu. Step 3: A wizard will take you through the steps necessary to set-up your first connection, just click on 'Create a new connection'. You will need the IP address and port number of the computer you want to connect to (you made a note of it earlier).
Fig. 3 - Use the connection wizard to start a new connection If you prefer to skip the wizard, click on 'Continue'. The fastest way to create a new connection is to write the name or IP of the NoMachine host you want to connect to in the text field and click on the 'Press enter to create a new connection' link. This method will use the default NX protocol on port 4000. Alternatively, you can click on the 'New' icon next to the white text field to configure the session in more detail. See also this Getting Started Guide: https://www.nomachine.com/getting-started-with-nomachine
Pre-requisite is having a desktop environment installed. Steps to connect to the remote host are the same as described in the previous paragraph. When connecting, you are prompted with this dialog:
When you are sit in front of the computer, you can switch off/on the ability to accept connections to your desktop via NoMachine. When you disable the sharing of your screen, nobody can connect. You can configure this setting via the NoMachine Monitor menu (right click on the !M icon in the system tray to open it) by clicking on item "Accepting connection is now enabled/disabled". This setting lasts until you change it again, even when you physically log-out from the system. See also this tutorial for more details: https://www.nomachine.com/disabling-access-to-your-local-desktop
|
||||||||||||||||||||||||||||||||||||||||||||||||||||||||||